Ruby on Rails Embedded React Chat Component Part 1: PubNub
About a year ago, I created an embedded React chat component within a standard page of a Rails app I was working on. I used PubNub for the realtime messaging of that chat component. I recently wanted to learn how to use Action Cable and how it handles realtime WebSocket communication between the server and client. I decided to use the same chat component within a clone of the app to learn about Action Cable as quickly as possible. At first, I was just going to write about the Action Cable setup but then I thought that maybe I will show how to use the PubNub service first and create a two part series that compares the two ways of handling realtime communication.
This is a tutorial describing how I implemented both versions of the chat component. I know what you’re thinking – not another chat app tutorial. One reason for the chat example is because this is not a standalone chat app but rather a React chat “component” that is embedded in an existing standard Rails page that complements the other features of the page. I thought that some readers could possibly benefit from this slightly different implementation while learning how to integrate a React component that uses realtime communication within an existing Rails page. Anyone reading this should be able to replace the chat component with any other type of realtime data service.
The key technology stack components consists of the following:
- Ruby on Rails
- React on Rails
- Webpacker
- React
- Redux
- PubNub
Part 1 of this series will show how to build the embedded React chat component using the awesome React on Rails gem. This setup will also use the Webpacker gem which greatly simplifies Webpack configuration. We will then add the PubNub API code for the communication piece as an alternative to Action Cable. Part 2 of this series will use the same Rails app and React chat component but will use Action Cable and WebSockets for realtime communication. The reason the Action Cable portion is second is because we will need to add more Rails code to get it to work plus I created the PubNub version first anyway.
Throughout this tutorial, I’ve tried to include the most pertinent info needed to get this app working correctly while keeping it as concise as possible. Some prior knowledge of the technologies used would be beneficial. I recommend other more basic tutorials if you’ve never used React or Redux. Please see the documentation for more details of the libraries we will be using. This tutorial also assumes your Rails app is already created. I will not be going over how to create a new one. Let us begin with Part 1.
Overview of the Existing Rails App
The existing Rails app is called Grow and Swap. The idea of the app is to provide an online space for home gardeners to post extra produce they may have (i.e. tomatoes, eggplant, etc.) to trade with other gardeners’ produce near them. The key component is the “trade offer” page. This page displays a trade offer that a user has created which shows what item they want from another user. The business logic of the app allows the other user to browse and pick items from the first user that they would like to trade in return.
I originally added a React chat component on this same page so that the two users could communicate with each other on any particular details of the trade like where and when to meet for the trade or whether they would rather ship their items. The chat “channel” or “room” is confined only to the one TradeOffer instance while other instances have their own unique channel. Also, there can only be two users for each TradeOffer. Other users would not be able to see the chat thread. I won’t be getting into the details of the TradeOffer Rails code except for where it ties in the React on Rails helper methods.
Add Webpacker and React on Rails
We will be using the React on Rails gem to provide some convenient helper methods in our layout, TradeOffersController, and TradeOffer#show view page. We will also be using Redux to help manage our state. React on Rails provides helper methods for this as well. Webpacker is a gem that simplifies the use of Webpack for a Rails app and helps to conform to the Rails “Convention over Configuration” doctrine. If you need basic Webpack configuration, then this gem is highly recommended. If you are creating a commercial grade app, you may want to add the Webpack module to your package.json file and configure it yourself. Also of note is the Webpacker gem requires Node.js 6.0.0+ and Yarn 0.25.2+ according to the docs. Let’s begin by adding the latest react_on_rails and webpacker gems to the Gemfile:
# Gemfile

# See GitHub for the latest versions
gem 'react_on_rails', "10.1.1"
gem 'webpacker', '~> 3.0'
Run bundle install and the following two commands to install webpacker with React:
bundle exec rails webpacker:install
bundle exec rails webpacker:install:react
Don’t forget to use the rake command instead of rails if you are not using Rails version 5 or later. The React option will configure Webpacker for React, add the appropriate Yarn dependencies, and a React “Hello World” example. This will create the following directories which is where our React components will live:
app/javascript/
└── packs
    └── application.js
Also added is a webpacker.yml file in the config folder. It is organized around the three default Rails environments: development, test, and production. This file contains the basic configuration for Webpack similar to a webpack.config.js file you may find in frontend apps but the Webpacker version is in YAML format. There shouldn’t be anything you need to modify in this file for most configurations. Things like css/sass loaders, hot module replacement (HMR), and hot reloading of assets should work out of the box. Webpacker adds other config files as well. If using Rails versions earlier than version 5, then Webpacker should create a package.json file in your app root directory and add the appropriate npm packages. You probably also noticed that yarn install was automatically ran by Webpacker. Please see the Webpacker GitHub page for more information on Webpacker inner workings and configuration.
Next, commit your changes to git before running the React on Rails installer. Run the React on Rails installer with the help option to view a list of options:
rails generate react_on_rails:install --helpThen run the installer with the Redux option:
rails generate react_on_rails:install --reduxThis will of course create and modify a lot of files and add gem/npm packages most of which I won’t get into in this article but you can checkout the React on Rails docs for more details. The important piece that it creates is a “hello world” React-Redux example with all of the files needed for it to work. You can model your own React-Redux components off of this example and then delete the “hello world” files later if you wish. Also created are Procfiles in the root directory since React on Rails recommends using Foreman to manage your app startup. Ensure you have Foreman installed on your system: gem install foreman. The React on Rails npm package is also added to the package.json file. The version of this package must match the React on Rails gem version in your Gemfile.
After the installer finishes, there should be a print out of next steps instructions. Follow these steps as necessary. We will cover them as we build our chat component. Try running the app and the “hello world” React-Redux example should work:
foreman start -f Procfile.dev-serverMake sure you reference the correct Procfile/script with this command. You may need to add a few packages to your package.json file. This is what mine looks like:
{
  "name": "grow-and-swap",
  "version": "0.0.1",
  "private": true,
  "engines": {
    "node": "8.9.3",
    "npm": "5.6.0"
  },
  "scripts": {},
  "devDependencies": {
    "webpack-dev-server": "^2.9.7"
  },
  "dependencies": {
    "@rails/webpacker": "^3.2.0",
    "babel-preset-react": "^6.24.1",
    "prop-types": "^15.6.0",
    "pubnub": "^4.19.0",
    "react": "^16.2.0",
    "react-addons-update": "^15.6.2",
    "react-dom": "^16.2.0",
    "react-on-rails": "^10.0.2",
    "react-redux": "^5.0.6",
    "redux": "^3.7.2"
  }
}
Notice for Part 1 you will need the PubNub npm package as we will be connecting to the API in JavaScript. prop-types will be used for type checking. Some of the above packages were added before using Webpacker and may not be needed. Webpacker provides a lot of them packaged with the gem. Simply add what you need to this file later if any dependency errors come up. Once you have added your packages, run yarn install.
Rendering the Chat Component in the Rails View
We will start by adding React on Rails helpers to the existing Rails app. There are a lot of moving pieces between React on Rails and the frontend React/Redux code to keep them connected so I will start by a high level walk-through of the relevant files before going over the Rails code in detail.
When a user clicks on a specific trade offer, Rails will route the request to the trade_offers#show action in trade_offers_controller.rb. In the show action, objects are retrieved as normal for the page and then props are initialized for the Chat component and passed to the React on Rails redux_store helper. When the page loads, the react_component helper in show.html.erb is where the Chat component will be rendered. Since we need this component to be hydrated with initial data by React on Rails, we need to have the redux_store_hydration_data helper preferably in the main layout application.html.erb and at the end of the file so that it loads after the view’s HTML.
From there, React and Redux takes over updating the state as long as the user stays on that page. In other words, the page is now a single page app!
Let’s now go over the Rails code in detail. Add the React on Rails controller extension to the application controller so that all controllers inherit the controller/view helpers:
# app/controllers/application_controller.rb

class ApplicationController < ActionController::Base
  include ReactOnRails::Controller

  protect_from_forgery with: :exception
end
Next, let’s add the trade offer controller code:
# app/controllers/trade_offers_controller.rb

class TradeOffersController < ApplicationController
  def show
    @reciprocal_trade_offer = @trade_offer.reciprocal_trade_offer

    # Need to know the id of the initiating trade offer so that the React Chat
    #   component PubNub channel is always the same regardless of which trade
    #   offer is clicked on -- initial or reciprocal.
    if @reciprocal_trade_offer.nil?
      initial_trade_offer_id = @trade_offer.id
    else
      initial_trade_offer_id = [@trade_offer.id, @reciprocal_trade_offer.id].min
    end

    # Initial state for react_on_rails component
    @chat_props = { channel:    "trade_offer_#{initial_trade_offer_id}",
                    messages:   [],
                    newMessage: ""
                  }

    redux_store("chatStore", props: @chat_props)
  end
end
The trade offer code here is not of that much importance for this tutorial but it is placed here to show where you would pull your data from the Rails database (don’t worry, the before action filter pulling the trade offer from the database is there just not shown). For this specific app, the PubNub channel is set by the initiating trade offer ID and passed to the channel prop as a string. This is how only two trade offer pairs will have their own private chat channel. The other props messages and newMessage are initiated with an empty array and string respectively. This initial state is saved as an instance variable and then passed to the redux_store helper along with the name of the store we want React on Rails to connect with.
The controller will respond and render the following show page:
<!-- app/views/trade_offers/show.html.erb -->

<!-- Place React component at end of file below other erb code -->
<%= react_component("ChatApp") %>
This helper is all that is needed on the show page for this component to render. That is pretty unobtrusive! You can wrap this in element tags if needed but I recommend to keep all HTML and CSS with the component. In this example, the component is placed at the end of the file but it can be placed anywhere on the page.
The last piece for the Rails side in this example is the redux_store_hydration_data helper:
<!-- app/views/layouts/application.html.erb -->

<%= redux_store_hydration_data %>
This helper will render a hidden div with the Redux store hydration data. This should be placed in the main layout below yield so that the hydration data will render after the HTML. This is recommended by React on Rails in case there is a large amount of data. That is all that is needed on the Rails side and we are now ready to move on to building our chat component client side code.
Building the Chat Component
I would like to mention one important note. This JavaScript code will be written primarily using ES6 and thus the Babel compiler will be needed. The Webpacker gem installs the needed Babel modules so you shouldn’t need to add any to the package.json file.
React Component File Organization and Layout
The chat component we’ll create will be structured pretty much the same as the “hello world” React-Redux example that was installed by React on Rails. Here is the file structure for the frontend component files (with the “hello world” example deleted):
app/javascript/
├── bundles
│   ├── Chat
│   │   ├── actions
│   │   │   └── chatActionCreators.jsx
│   │   ├── components
│   │   │   ├── Chat.jsx
│   │   │   ├── ChatMessageList.jsx
│   │   │   └── chat.scss
│   │   ├── constants
│   │   │   └── chatConstants.jsx
│   │   ├── containers
│   │   │   └── ChatContainer.jsx
│   │   ├── reducers
│   │   │   └── chatReducer.jsx
│   │   ├── startup
│   │   │   └── ChatApp.jsx
│   │   └── store
│   │       └── chatStore.jsx
└── packs
    ├── application.js
    └── chat-bundle.jsx
If you’re new to React and Redux, you’re probably thinking that’s a lot of files just for a Chat frontend component. The code we’ll be writing in these files could be written in one but we will be following React on Rails and Redux recommendations for the app structure. This will help immensely if more React components are added to your app later by keeping the pieces well organized.
Entry Files and Component Startup
The packs directory contains the entry files while the bundles directory contains the components code. All javascript code that you want Webpack to compile will live in the app/javascript directory. You can still use the asset pipeline and put javascript code in your assets directory but code that lives here will be totally separate from the asset pipeline and bundled by Webpack. The source entry file for Webpack is application.js. This will be your top-level file for importing all of your React components similar to the application.js file that lives in the assets directory. In this case, it will be one component:
// app/javascript/packs/application.js

import './chat-bundle'
Next, add the following code to the source entry file imported above:
// app/javascript/packs/chat-bundle.jsx

import ReactOnRails from 'react-on-rails'

import ChatApp from '../bundles/Chat/startup/ChatApp'
import chatStore from '../bundles/Chat/store/chatStore'

ReactOnRails.register({ ChatApp })

ReactOnRails.registerStore({ chatStore })
Starting at the top, we import the React on Rails npm package that was added to the package.json when we ran the installer. Next, we import the top-level ChatApp file that lives in the startup directory, then import the chatStore file for the Redux store. The next couple of lines is where we register the ChatApp and chatStore with React on Rails. This is how we connect the frontend code to Rails. According to the React on Rails docs, we register components and mount them with Rails view helpers instead of mounting components directly to elements with React.render. It is important to remember this when referencing React docs as this may cause some confusion.
Next, let’s go over the top level React component file ChatApp.jsx. Here, we will call ReactOnRails.getStore so that props from the Rails controller/view can be passed into the Redux store. React on Rails generated comments are left in for clarification:
// app/javascript/bundles/Chat/startup/ChatApp.jsx

import React from 'react'
import { Provider } from 'react-redux'
import ReactOnRails from 'react-on-rails'

import ChatContainer from '../containers/ChatContainer'

// See documentation for https://github.com/reactjs/react-redux.
// This is how you get props from the Rails view into the redux store.
// This code here binds your smart component to the redux store.
// railsContext provides contextual information especially useful for server rendering, such as
// knowing the locale. See the React on Rails documentation for more info on the railsContext

const ChatApp = () => {
  const chatStore = ReactOnRails.getStore("chatStore")

  return (
    <Provider store={chatStore}>
      <ChatContainer />
    </Provider>
  )
}

export default ChatApp
chatStore is passed in as an argument to ReactOnRails.getStore. Remember that this store was registered with React on Rails previously. The store is then passed to Provider to bind it to the React container component.
You see that we have the <ChatContainer /> component nested within the <Provider> React-Redux component. This is how the chatStore is made available to the Chat component without passing the store as a prop. If you ever want to add another React component to your Chat component, just reference it here. For this tutorial, we just have <ChatContainer />.
Container Component
Before we get too deep into the Redux code, let’s now look at this React “smart” container component and the actual chat code:
// app/javascript/bundles/Chat/containers/ChatContainer.jsx

import React from 'react'
import { bindActionCreators } from 'redux'
import { connect } from 'react-redux'

import Chat from '../components/Chat'
import * as actionCreators from '../actions/chatActionCreators'

const mapStateToProps = (state) => ({
  channel: state.channel,
  messages: state.messages,
  newMessage: state.newMessage
})

const mapDispatchToProps = (dispatch) => ({
  actions: bindActionCreators(actionCreators, dispatch),
})

// Don't forget to actually use connect!
// Note that we don't export Chat, but the redux "connected" version of it.
// See https://github.com/reactjs/react-redux/blob/master/docs/api.md#examples
export default connect(mapStateToProps, mapDispatchToProps)(Chat)
We import the React Chat presentational component and return the Redux “connected” version of it as the comments show. This is how our Chat component will actually connect to Redux. The mapStateToProps() function returns an object containing the state the chat component will need passed as props. The mapDispatchToProps() function returns an object containing the actions (or redux action creators) that binds to the Redux dispatch method for actual dispatching of actions. These actions are passed to the chat component as props similar to the state. Finally, we call the React-Redux binding connect() to connect the Chat component to Redux.
Presentation Components
Let’s go through our actual Chat component code. This is where we will spend most of our time because most of the functioning Chat code will go here including the PubNub API code later on. First, let’s create our Chat class:
// app/javascript/bundles/Chat/components/Chat.jsx

import React from 'react'
import PropTypes from 'prop-types'

export default class Chat extends React.Component {
  static propTypes = {
    channel: PropTypes.string.isRequired,
    messages: PropTypes.object.isRequired,
    newMessage: PropTypes.string.isRequired,
    actions: PropTypes.object.isRequired
  }

  constructor(props) {
    super(props)
    this.onNewMessageChange = this.onNewMessageChange.bind(this)
    this.autosize = this.autosize.bind(this)
    this.onNewMessageKeyPress = this.onNewMessageKeyPress.bind(this)
    this.onSubmitClick = this.onSubmitClick.bind(this)
    this.submitNewMessage = this.submitNewMessage.bind(this)
    this.fetchHistory = this.fetchHistory.bind(this)
  }
}
Instead of writing pure functions, we need to create an ES6 class so that we have access to React’s lifecycle methods. Along with React, we’ve imported PropTypes so that we can do some type checking on our props to aid us in development and prevent bugs if this were to be deployed to production. First, we call a static method for this type checking on our Chat props and actions. Next, we initialize our props with a call to super and bind our class methods to the Chat instance in the constructor method. Don’t worry, we will be going through each of these methods. Feel free to add additional methods to this class, just don’t forget to bind them to the instance here.
Now to rendering the Chat component. Let’s start by adding some empty div elements to the render() method:
// app/javascript/bundles/Chat/components/Chat.jsx

render() {
  return (
    <div id="chat-container">
      <div id="chat-component">
        <div id="messages">
        </div>

        <div id="message-input">
        </div>
      </div>
    </div>
  )
}
The chat-container div is for CSS styling purposes only. The chat-component div will wrap the two main sub-components – messages and message-input. Let’s now add the textarea and button elements:
// app/javascript/bundles/Chat/components/Chat.jsx

render() {
  return (
    <div id="chat-container">
      <div id="chat-component">
        <div id="messages">
        </div>
        <div id="message-input">
          <span>
            <textarea
              type="text"
              ref={(textarea) => { this.textArea = textarea }}
              placeholder="Enter message here"
              value={this.props.newMessage}
              onChange={this.onNewMessageChange}
              onKeyPress={this.onNewMessageKeyPress}
            />
          </span>
          <span>
            <button onClick={this.onSubmitClick}>Submit</button>
          </span>
        </div>
      </div>
    </div>
  )
}
These are wrapped in a couple of span elements so that they render next to each other. The textarea has a ref attribute that sets a reference to the textarea for the autosize() method we’ll write later. This is the latest syntax for creating ref’s as of React version 16.2.0. The value attribute is set by the newMessage props as a user types in their message. This is a React “controlled component” with state that updates the Redux store for each character entered. The onChange event calls the onNewMessageChange event handler for each character entered. The onKeyPress event calls the onNewMessageKeyPress handler when the user hits enter. Lastly, we have a button onClick event as well. Let’s go over each of these event handler methods (remember these were defined in the constructor):
// app/javascript/bundles/Chat/components/Chat.jsx

onNewMessageChange(event) {
  this.props.actions.changeNewMessage(event.target.value)
  this.autosize()
}
This event handler passes the event value to the changeNewMessage() action that we’ll go over later during the Redux code overview. All actions are passed down as props from the chatStore. This method then calls the autosize() method to handle automatic size changing of the textarea element as the message text wraps to a newline. I won’t get into the details of this code but this is what it looks like:
// app/javascript/bundles/Chat/components/Chat.jsx

autosize() {
  setTimeout(() => {
    this.textArea.style.height = 0
    const height = Math.min(100, this.textArea.scrollHeight)
    this.messageInput.style.height = height + 'px'
    this.textArea.style.height = height + 'px'
  }, 0);
}
The one thing I will point out is the textArea ref we set earlier in the textarea element. The ability to use refs is one of the benefits of using a React class component versus a pure functional component. If implemented correctly along with CSS styling, our textarea should grow upwards line by line up to a limit and then start to scroll after that. Once the newMessage is submitted, then the textarea will reset back to it’s default one-line height. I’m sure autosize() could be implemented as a controlled component and the state changed via a Redux reducer but we will leave it as is for this tutorial. Feel free to implement this yourself.
The next event handler is as follows:
// app/javascript/bundles/Chat/components/Chat.jsx

onNewMessageKeyPress(event) {
  if (event.key === 'Enter') {
    this.submitNewMessage(this.props.newMessage)
    event.preventDefault()
  }
}
This event handles the user pressing enter to submit the message. You could also omit this handler altogether if you prefer enter to simply create a newline and only allow onSubmitClick() to handle message submit. This handler passes the current newMessage prop to the submmitNewMessage() method.
Now the onSubmitClick() event handler:
// app/javascript/bundles/Chat/components/Chat.jsx

onSubmitClick() {
  this.submitNewMessage(this.props.newMessage)
}
This handler also passes the current newMessage prop to the submmitNewMessage() method. We will go over this method later in the tutorial when we connect to the PubNub API.
That almost covers everything we need for the presentational portion of the message-input component. Another reason we use the ES6 class is to access the React lifecycle methods for connecting to PubNub and other behavior that we will cover soon. So far, this is what our message-input looks like:
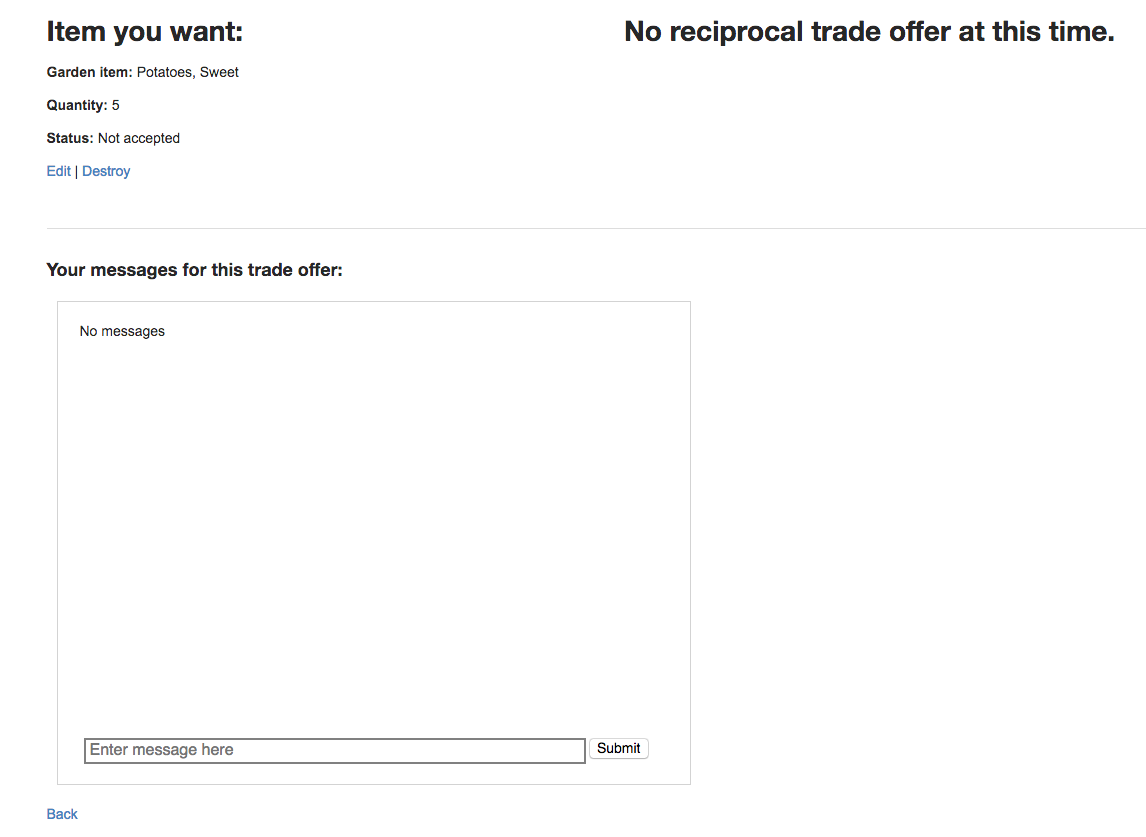
This screenshot is the finished product. You won’t be able to render the component until all the required React and Redux code is finished. The screenshot is just here to show what the message-input will look like. Notice the component is embedded in a Rails page with other elements above it.
Next, lets write our messages component code. We will import a MessageList component from another file since we already have quite a bit of code in our Chat.jsx file:
// app/javascript/bundles/Chat/components/Chat.jsx

import MessageList from './ChatMessageList' // Add this below other import statements

render() {
  return (
    <div id="chat-container">
      <div id="chat-component">
        <div id="messages" ref={div => { this.messagesDiv = div }}>
          <MessageList messages={this.props.messages} />
        </div>

        <div id="message-input" ref={div => { this.messageInput = div }}>
          <span>
            <textarea
              type="text"
              ref={(textarea) => { this.textArea = textarea }}
              placeholder="Enter message here"
              value={this.props.newMessage}
              onChange={this.onNewMessageChange}
              onKeyPress={this.onNewMessageKeyPress}
            />
          </span>

          <span>
            <button onClick={this.onSubmitClick}>Submit</button>
          </span>
        </div>
      </div>
    </div>
  )
}
Add the import statement to the top of the file below the other import statements and then add the <MessageList /> element to the messages div created earlier. The messages props are passed to the messages attribute. Also take note of another ref added called messagesDiv. We will get back to what this ref is used for when we add some styling and manipulate behavior.
Let’s take a look at the ChatMessageList file to see what’s going on. We want to render a list of the messages that are passed down as props from the Redux store. Let’s write a function that returns this list:
// app/javascript/bundles/Chat/components/ChatMessageList.jsx

import React from 'react'
import PropTypes from 'prop-types'

const MessageList = (props) => {
  if (props.messages.length > 0) {
    return props.messages.map(m => {
      return (
        <div id="message" key={m.entry.id}>
          {m.entry.content}
          {timeOfMessage(m.entry.id)}
        </div>
      )
    })
  }
  else {
    return <div id="message">No messages</div>
  }
}
First, import the usual React and PropTypes for our component. You’ve probably noticed that we don’t import any Redux modules in our presentational components – Chat.jsx or ChatMessageList.jsx. These two files are React code only and don’t know anything nor care about Redux. This code would still work if you don’t want to use Redux. We will connect to Redux soon in our container component.
We are writing pure functions in this file since we don’t change local state or require lifecycle methods. The MessageList() function simply uses Array.map() to return a list of messages if messages exist, else it returns “No messages”.
To display the time of the message, the timeOfMessage() function takes the message id as an argument (this id uses Date.now() as its unique identifier as will be shown soon) and returns either the time of message if during the same day or the date of message if more than one day has elapsed:
// app/javascript/bundles/Chat/components/ChatMessageList.jsx

const timeOfMessage = (date) => {
  const message_date = new Date(date)
  const today = new Date()

  if (message_date.getDate() === today.getDate()) {
    return (
      <div id="date">
        {message_date.toLocaleTimeString()}
      </div>
    )
  }
  else {
    return (
      <div id="date">
        {message_date.toLocaleDateString()}
      </div>
    )
  }
}
The only thing remaining in this file after the timeOfMessage() function are the PropTypes declarations and exporting MessageList:
// app/javascript/bundles/Chat/components/ChatMessageList.jsx

MessageList.propTypes = {
  messages: PropTypes.arrayOf(
    PropTypes.shape({
      entry: PropTypes.shape({
        id: PropTypes.number.isRequired,
        content: PropTypes.string.isRequired
      })
    })
  ).isRequired
}

export default MessageList
PubNub
Let us now connect to the PubNub API for our realtime messaging functionality. PubNub is a great tool for this with an easy to use but comprehensive API for pretty much any messaging behavior needed. Its global data stream network provides very efficient low-latency realtime messaging and is an alternative to creating a Rails model and controller to save and retrieve messages. The key to this is the PubNub Storage and Playback feature that allows you to call up a history of messages from their storage. There is a default limit of 100 messages. You can call up additional messages with 100 messages per page but if you really need more reliable persistence, then PubNub offers a storage add-on with different tier levels. Of course, using Rails to persist messages to your own database is always an option.
PubNub uses the publish/subscribe pattern and thus requires a publish key and subscribe key to connect to the API so the first thing you need to do is signup for an account on their website. During the signup process, you will create your publish and subscribe keys. Add the npm package with yarn add pubnub. The code in this tutorial used to make the API calls is with version 4.19.0. See the PubNub website for migrating to later versions if the API has changed. You can also checkout this tutorial for a more in-depth overview. Next, add your import statement to Chat.jsx:
// app/javascript/bundles/Chat/components/Chat.jsx

import PubNub from 'pubnub'
We will now create a new PubNub instance using the publish and subscribe key created during the signup step. This will be done in the componentDidMount() lifecycle method so that anytime a user goes to the TradeOffer#show page React will call this method just after mounting the Chat component which in turn will create the new PubNub instance:
// app/javascript/bundles/Chat/components/Chat.jsx

componentDidMount() {
  this.pubnub = new PubNub({
    publishKey: "<your-app-publish-key>",
    subscribeKey: "<your-app-subscribe-key>",
    ssl: true
  })

  this.pubnub.addListener({
    message: (response) => {
      this.props.actions.incomingMessage(response.message)
    }
  })

  this.pubnub.subscribe({
    channels: [this.props.channel]
  })

  this.fetchHistory()
}
ssl default setting is false so set to true if required for making requests over HTTPS. Additional method calls that are required in the componentDidMount() method was already added. Let’s go through each of those.
The pubnub.addListener() method is what listens for incoming new messages that have been published either by the current client or other clients. This method has a callback function message() that we use to grab the response with the message payload and pass this to the incomingMessage() action. This action adds the new message to the messages array in the Redux store.
The pubnub.subscribe() method is pretty self-explanatory. We use this.props.channel passed down from the store. We saw earlier how the initial state of this channel was created in the trade_offers#show action.
The last method call is fetchHistory(). This is our own class method defined as follows:
// app/javascript/bundles/Chat/components/Chat.jsx

fetchHistory() {
  this.pubnub.history({
    channel: this.props.channel,
    count: 30
  }).then((response) => {
    this.props.actions.addHistory(response.messages)
  })
}
We call the pubnub.history() method to load previously created messages when we load the Chat component. See the PubNub docs for details of how to use this method. We have set this to call the last 30 messages assuming that users that want to trade produce probably don’t need to have a long discussion about their trade. This can be omitted if you want the default last 100 messages. The key part of this method is the use of promises that enables us to call up an appropriate action to handle the response to this method call. We call up the addHistory() action and pass the history messages array included in the PubNub response.
There is one more method to go over in our Chat component – submitting a message:
// app/javascript/bundles/Chat/components/Chat.jsx

submitNewMessage(text) {
  const messageObj = {
    id: Date.now(),
    content: text
  }

  this.pubnub.publish(
    {
      message: messageObj,
      channel: this.props.channel
    },
    function (status, response) {
      if (status.error) {
        // handle error
        console.log(status)
      } else {
        console.log("message Published w/ timetoken", response.timetoken)
      }
    }
  )

  this.props.actions.submitMessage()
  this.textArea.focus()
}
This method starts with creating a message object consisting of id and content properties. We create a unique ID by setting it to the current date and time that the message is created. The content is set to the text argument (recall that the submit and key press event handlers pass the newMessage props to this method). We then call pubnub.publish() to publish the new message to the connected channel. The callback function handles any status errors that may arise. Finally, the submitMessage() action is called which triggers the newMessage reducer to simply update the state by returning a new empty string. Then the textArea ref is used again to call the focus() method on the textarea.
This should cover all the working components of connecting to the PubNub API. As you can see, it’s fairly simple and straightforward.
We now have our presentational components completed except for some styling. Add import './chat.scss' below the other import statements in both Chat.jsx and ChatMessageList.jsx and create the following stylesheet:
/* app/javascript/bundles/Chat/components/chat.scss */

body {
  font-family: Arial, sans-serif;
}

#chat-container {
  width: 600px;
  height: 450px;
  margin: 20px 10px;
  border: 1px solid lightgray;
  padding: 16px;
}

#chat-component {
  display: flex;
  flex-direction: column;
  height: 100%;
}

#messages {
  overflow: scroll;
  padding-bottom: 10px;
  flex: 1;
}

#message {
  border-bottom: 1px dotted lightgrey;
  padding: 4px 6px;
  word-wrap: break-word;

  &:last-child {
    border-bottom: 0;
  }

  #date {
    text-align: right;
  }
}

#message-input {
  margin: 0;
  padding: 10px 10px;
  width: 565px;
  height: 20px;
}

textarea {
  margin: 0;
  font-size: 16px;
  padding: 1px 4px;
  width: 490px;
  height: 20px;
  border: 2px solid gray;
  outline: 0;
  float: left;
  resize: none;
}

button {
  float: right;
}
Redux
It is now time to write our Redux code including the actions, reducers, and store. We’ll try to keep the description of each one of these pieces to a minimum. The Redux documentation can be referred to for more detail. Let’s start with our actions:
// app/javascript/bundles/Chat/actions/chatActionCreators.jsx

import {
  CHANGE_NEW_MESSAGE,
  SUBMIT_NEW_MESSAGE,
  ADD_HISTORY,
  INCOMING_NEW_MESSAGE
} from '../constants/chatConstants'

export const changeNewMessage = (newValue) => ({
  type: CHANGE_NEW_MESSAGE,
  newValue
})

export const submitMessage = () => ({
  type: SUBMIT_NEW_MESSAGE
})

export const addHistory = (messages) => ({
  type: ADD_HISTORY,
  messages
})

export const incomingMessage = (message) => ({
  type: INCOMING_NEW_MESSAGE,
  payload: {
    entry: message
  }
})
These functions are “action creators” that return action objects as the Redux docs describes. You’ve probably noticed that these functions or action creators are the same ones that are passed down as props to our Chat component. There isn’t anything too unordinary about these action creators except with incomingMessage(). Due to the object shape that PubNub returns in their API response, we need to match that shape when the client submits a new message. This is done with the payload object that includes an “entry” object with the message.
Redux recommends using string constants for the action type property. The constants imported above looks like this:
// app/javascript/bundles/Chat/constants/chatConstants.jsx

export const CHANGE_NEW_MESSAGE = 'CHANGE_NEW_MESSAGE'
export const SUBMIT_NEW_MESSAGE = 'SUBMIT_NEW_MESSAGE'
export const ADD_HISTORY = 'ADD_HISTORY'
export const INCOMING_NEW_MESSAGE = 'INCOMING_NEW_MESSAGE'
Next we will cover the reducers, this is where the rubber meets the road when using the Redux architecture. Redux recommends spending a good amount of time thinking about the app state shape. I’ve found this idea to be very useful because creating your reducers haphazardly can lead to confusion about the app state shape later on. You may not know what your state objects look like or how many levels of nesting they may include. I’ve found that it helps to create a “road map” so to speak by documenting the state shape in a comment in your reducer file:
// app/javascript/bundles/Chat/reducers/chatReducer.jsx

/*
State Shape:

{
  actions: {
    changeNewMessage,
    submitMessage,
    addHistory,
    incomingMessage
  },
  channel: 'trade_offer_1',
  messages: [
    {
      entry: {
        id: 1519354994372,
        content: 'Hello world!'
      },
      timetoken: 15193549944027228
    },
    {
      entry: {
        id: 519354994493,
        content: 'I love Redux!'
      },
      timetoken: 1519354994502873
    }
  ],
  newMessage: ''
}
*/
Keeping the state shape nesting to a minimum is always a good idea. As mentioned earlier, This shape reflects the messages array in the response from PubNub. I would rather this be flattened out a bit and could probably be done but we will keep it as is for this tutorial. Now that we have our shape, we can start writing our reducers:
// app/javascript/bundles/Chat/reducers/chatReducer.jsx

import { combineReducers } from 'redux'

import {
  CHANGE_NEW_MESSAGE,
  SUBMIT_NEW_MESSAGE,
  ADD_HISTORY,
  INCOMING_NEW_MESSAGE
} from '../constants/chatConstants'

const channel = (state = '', action) => {
  return state
}

const messages = (state = [], action) => {
  switch(action.type) {
    case ADD_HISTORY:
      return [
        ...state,
        ...action.messages
      ]
    case INCOMING_NEW_MESSAGE:
      return [
        ...state,
        action.payload
      ]
    default:
      return state
  }
}

const newMessage = (state = '', action) => {
  switch(action.type) {
    case CHANGE_NEW_MESSAGE:
      return action.newValue
    case SUBMIT_NEW_MESSAGE:
      return state = ''
    default:
      return state
  }
}

const railsContext = (state = {}, action) => {
  return state
}

const chatReducer = combineReducers({
  channel,
  messages,
  newMessage,
  railsContext
})

export default chatReducer
We import combineReducers() from Redux to combine all of the reducers into one. We also import the chat constants just like in the chatActionCreators file. The messages reducer is the most important one here for our Chat component. It utilizes the ES6 array spread operator to update the state of the messages array by first creating a copy and updating the copy, thereby avoiding mutating the original array. When the addHistory() action is triggered, the reducer appends the pubnub.history() array to the current array. When the incomingMessage() action is triggered, the reducer appends the single message returned by the PubNub response.
The newMessage() reducer updates the textarea value as the user types their message. This is what makes the textarea element a React “controlled component”. This reducer also clears the textarea when the newMessage is submitted. The railsContext() reducer is primarily used for setting the initial state of the railsContext props that is available from React on Rails. It isn’t required to be used at all. It is available for meta data purposes that includes things like URL settings. Finally, call combineReducers() to combine all the reducers in one and export that as chatReducer.
Now we can create the last piece of the Redux code, the store that is used to hold state:
// app/javascript/bundles/Chat/store/chatStore.jsx

import { createStore } from 'redux'

import chatReducer from '../reducers/chatReducer'

const chatStore = (props, railsContext) => {
  // Create a hydrated redux store, using props and the railsContext (object with
  // Rails contextual information).

  const newProps = { ...props, railsContext }
  return createStore(chatReducer, newProps)
}

export default chatStore
We create a function called chatStore() that is a “storeCreator” as React on Rails calls it. React on Rails comments were added in the code above that helps explain what’s going on. We create a newProps constant with the props object passed in using the object spread operator to copy all of its properties and the railsContext. Next, we call createStore() imported from Redux and pass in the imported chatReducer and newProps. The second argument is how React on Rails hydrates the initial state of the Chat component.
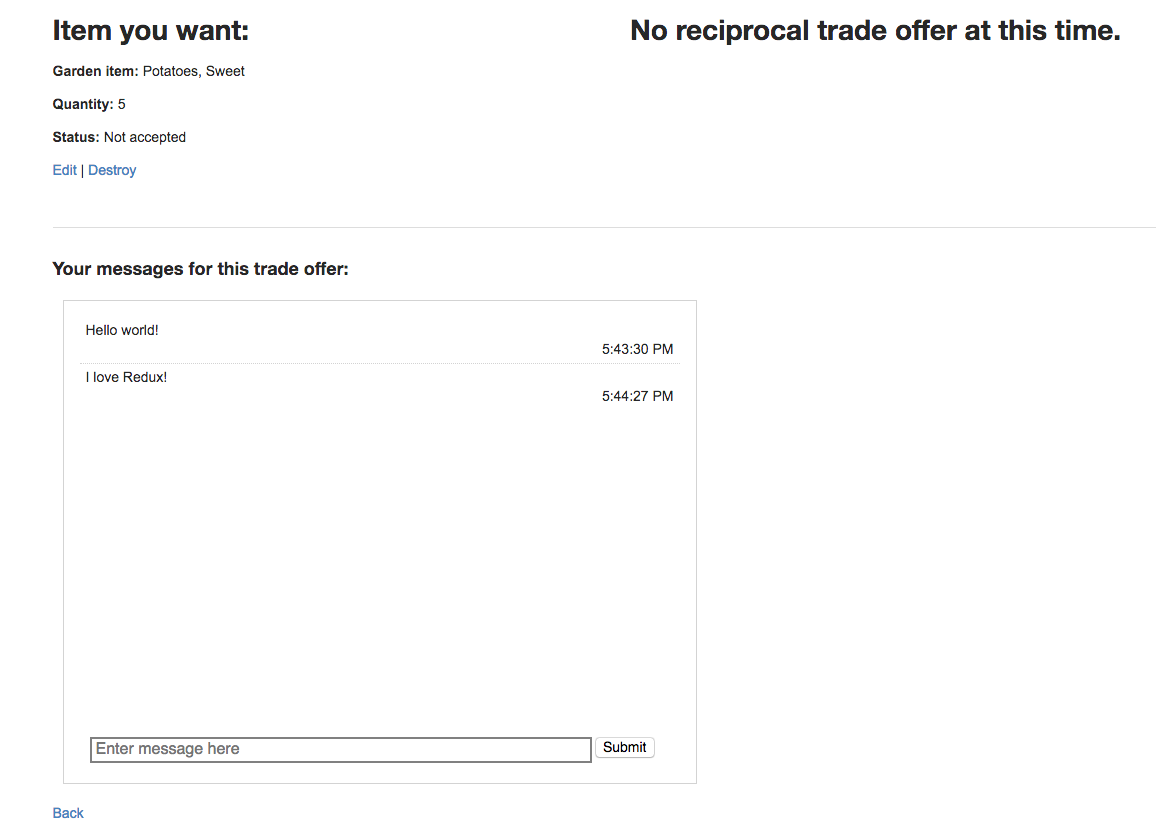
That’s all for the Redux code and our Chat component is now completed. Here is what the final product looks like with a couple of messages entered:
Conclusion
We have now completed our Rails embedded React Chat component by showing how to use the React on Rails gem to seamlessly add the component to a Rails page, building our React component itself, connecting to the PubNub API, and using the Redux pattern for maintaining state. That was a lot of code for such a small component but the good thing is a lot of this code can be used for other React components with minor changes for naming of props, data, and functions as well as designing the business logic of the reducers. When you start to add a lot of React components to create your dynamic web app, all this extra code will actually help to keep your components organized and keep concerns where they need to be to manage the state of those components.
Some companies may prefer to keep their React frontend codebase separate from their backend Rails app and make JSON requests but the React on Rails gem comes in handy when you prefer to keep all of your codebase in one app. The helper methods it provides allows the developer to pass data between the frontend and backend without dealing with JSON requests and responses.
That is all for now. Stay tuned for Part 2 of this series where we’ll show how to use this same Chat component with Action Cable and WebSockets for realtime messaging instead of PubNub.